Building a DIY basement bar and kitchenette, from start to finish!
I’m finally sharing a full tour of our basement kitchenette that I’ve
worked on for the past two years! We love this space so much and it’s about
time I show you the whole room.
I tackled so many DIY projects for this kitchen build and learned a ton along
the way. I even had a few do-it-myself firsts during this process.
The value of our home was definitely increased with this project as well.
(Although I will never leave this house if I can help it!)
We waited about five years to tackle this space after moving in. It was kind
of a catch all spot before:

I didn’t have the builder carpet this area, thinking we would start this
process right away. I was a little off on the timeline. 😉
We had wine fridges down here, and a microwave to make popcorn, but that was
about it.
We had all of the water and plumbing (water line for fridge and plumbing
for sink) roughed in when we built the house.
After I cleared everything out of here, it was time to start building a fun
and functional space for my family to enjoy.
Before I could start anything, we had the outlets moved to fit the layout
and up to counter height:

This post may contain affiliate links for
your convenience.
I may earn a small commission when you make a purchase through links.
We are spoiled, because this basement kitchenette is bigger than most I’ve
seen. We could have fit a whole kitchen in here! (This is probably twice the
size of all of my kitchens up till our last house.)
I’ll take you through the steps of this project (with links to full
tutorials) and then I’ll share the final reveal at the end of the
post.
almost every project on my own. I thought the
massive kitchen makeover
I did at our last house was a lot of work — this one beat that by far! It
took me more than a year to complete the space.
Building and installing cabinets
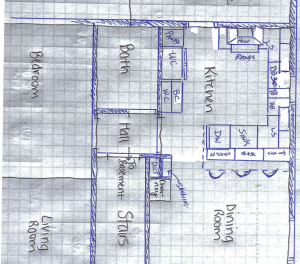
The first step in this space was figuring out a functional kitchenette layout.
The only major appliance in here is a fridge, so I didn’t have to worry about
a typical “work triangle.”
But I did want the room to flow well for us. After living with it for so long,
I can say the final layout has worked perfectly!
I decided on unassembled cabinets from Home Depot. They were SO easy to
assemble…once I got a couple down I was knocking them out fast.
We saved a ton of money building the cabinets myself. The price is
lower but they are made with quality materials and include all of the bells
and whistles like soft close doors and drawers:

Instead of using the (more expensive) refrigerator side panels, we had a 4×8
wood panel cut down. I later color matched the cabinets at the paint store to
paint these and the trim.

LVP flooring installation and review
This was my first time installing LVP flooring, and may be my last. 😂
OK, it wasn’t really that bad. I think if I had a more open space with
less things to cut around, it wouldn’t be nearly as much work.
We are thrilled with our choice for the flooring in this kitchen area. I chose
the Dusk Cherry color from the Lifeproof line at Home Depot.

We recently had a minor water issue (coming from an ice maker) and the floors
are still as good as new. They are waterproof and can be installed right on
top of cement.
Overall there has been ZERO wear and tear — nothing that I can see at all.
(That’s with four pets in the house as well.)
Countertop, sink and faucet installation
I’ve installed smaller countertops over the years, but nothing like this. I
chose butcher block counters for this area because they are 1. affordable 2.
easy to find and 3. look GREAT!
When I’ve installed these before, it’s been one piece. This time I measured,
cut down, fit and then stained and treated three large pieces before
installing:

Once they were in, I cut a hole for the single basin sink and installed that
with the faucet.
I can’t believe in my 25+ years of DIYing that I had never installed a faucet,
let alone one where I had to add all of the plumbing fixtures to the rough in
coming out of the wall.
But I did a TON of research, borrowed some tools from a friend and got it
done! I was SO proud of myself, especially when I turned on the water and
there wasn’t one leak. 🙂 (Even now!)

Sometimes my desire to learn new things comes from my complete and total
impatience to just get it done. Ha! It works out well for me.
Tile backsplash and DIY gallery rail
I used a dark ceramic tile with a faux marble look and black grout for the
backsplash. I love the contrast against the warm wood countertops:

I later installed black outlets and covers to blend in with the
backsplash.
One of my favorite projects in here was this “faux” gallery rail I added to a
small shelf above the tile:

Gallery rails are metal fixtures you can install on shallow shelves and/or
ledges — and I love the look of them. Problem is, they are VERY
expensive.
It gives us a great spot to display photos and art that we love.
DIY countertop bookcases
I’ve had these shelving units in mind for years! I really wanted to make the
space between them curved, but so far I haven’t added that detail.
I love built ins of any kind. I knew I could add some character to this room with some built in
shelves.

I love having a spot to add some decor, plus they are a great spot to hang our
wine classes. Stay tuned to see what I did with all of those wine corks!
DIY bar with hidden storage
Our plan all along was to built a bar/peninsula to finish up this space, but
it wasn’t till about a year later that I finally completed that part.
I had to figure out how I wanted it to work first. I ended up using wall
cabinets for the main part of the bar:

My only splurge in this kitchenette was the countertops on the bar. They are a
black granite with gold, white and gray tones and SO much pretty movement. The
installers matched the movement from the top to the side “waterfall”
piece:

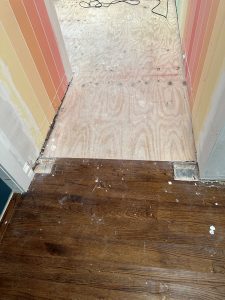
During this process, we also extended the floors to a nearby doorway. This
made the room feel so much bigger and gave the chairs room to be pulled out
easily.
Wine cork wall with dart board
This was another one of my favorite projects, even though it took FOREVER. 😂
We’ve had a ton of wine corks that I’ve saved up for 15-20 years, knowing I’d
do something fun with them eventually.

The process was easy, just time consuming. I shared how I easily cut the corks
in that post as well!
Now let’s take a look at the whole finished space! There was one addition I
hired out at the end — I painted the crown molding but had some help putting
it up. I was worn out!
I had it wrapped around the bookcases as well, so it makes them look more
custom and ties them into the space even more:

We’ve had these wine refrigerators forever. They aren’t the same but look
super similar.
I just swapped the direction of the door on one, so we can open them from
the middle of this area:

The other side of the room isn’t as exciting, but it is super functional! This
is where most of the storage is, these cabinets provide more than enough down
here:


My cabinet layout had some open, awkward spaces. So instead of wasting space
in the corners under the counters, I decided to add some simple open shelving
on either side of the sink cabinet:

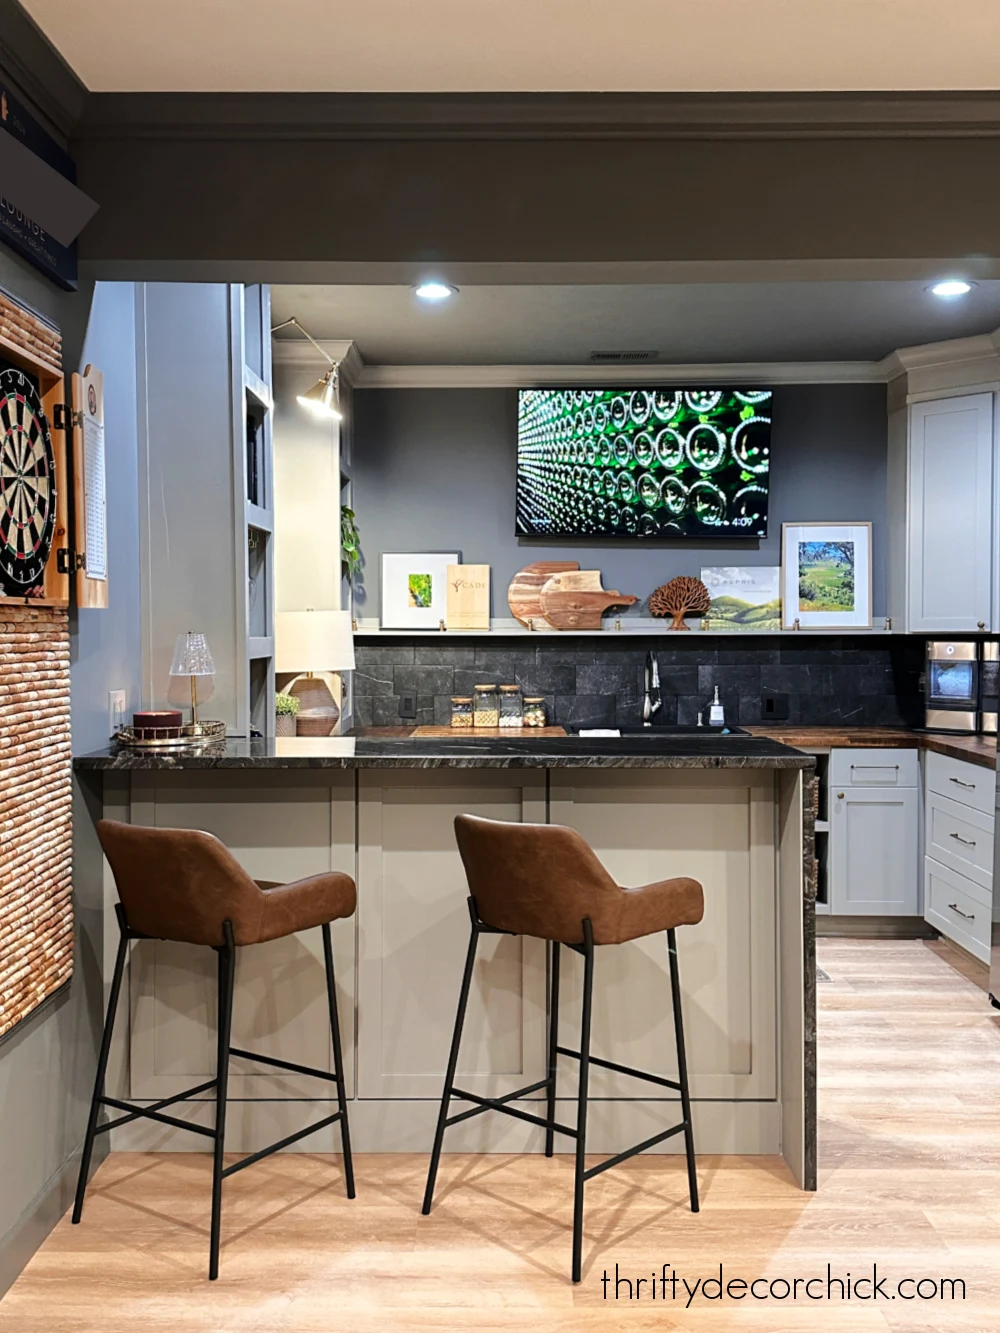
We loved this space before I finished the bar, but it finally feels complete
with it done! Our son loves to sit here and do homework:

I forgot one additional change we had done as well — an electrician ran a
couple recessed lights over the bar:

I didn’t want hanging lights, as I thought it would get too busy. The recessed
lights are perfect, and of course are on a dimmer so we can dim the light if
needed.
The hidden storage in the bar is awesome, and I have to show everyone where it
is when they visit. 😉
We love this space so much, it’s been a wonderful addition when we entertain
our family and friends. But my little family uses it most of all — we are
definitely basement people and at least one of us spends time down here every
evening.
Hope you enjoyed the tour, let me know if you have any questions! I’ll include
sources at the bottom of the post:


Sources for items in this room: