One thing I love about DIY is trial and error. The thing I hate the most about DIY is trial and error. 😀 I know, I can be confusing. I do love trial and error as long as the trials and errors last just two or three rounds. Trial and error is a great way to learn about new processes and products. But if that trial and error phase lasts more than about two or three rounds before I come across the process and/or product that will accomplish my goal, I start getting really frustrated. And that’s exactly what happened this past weekend.
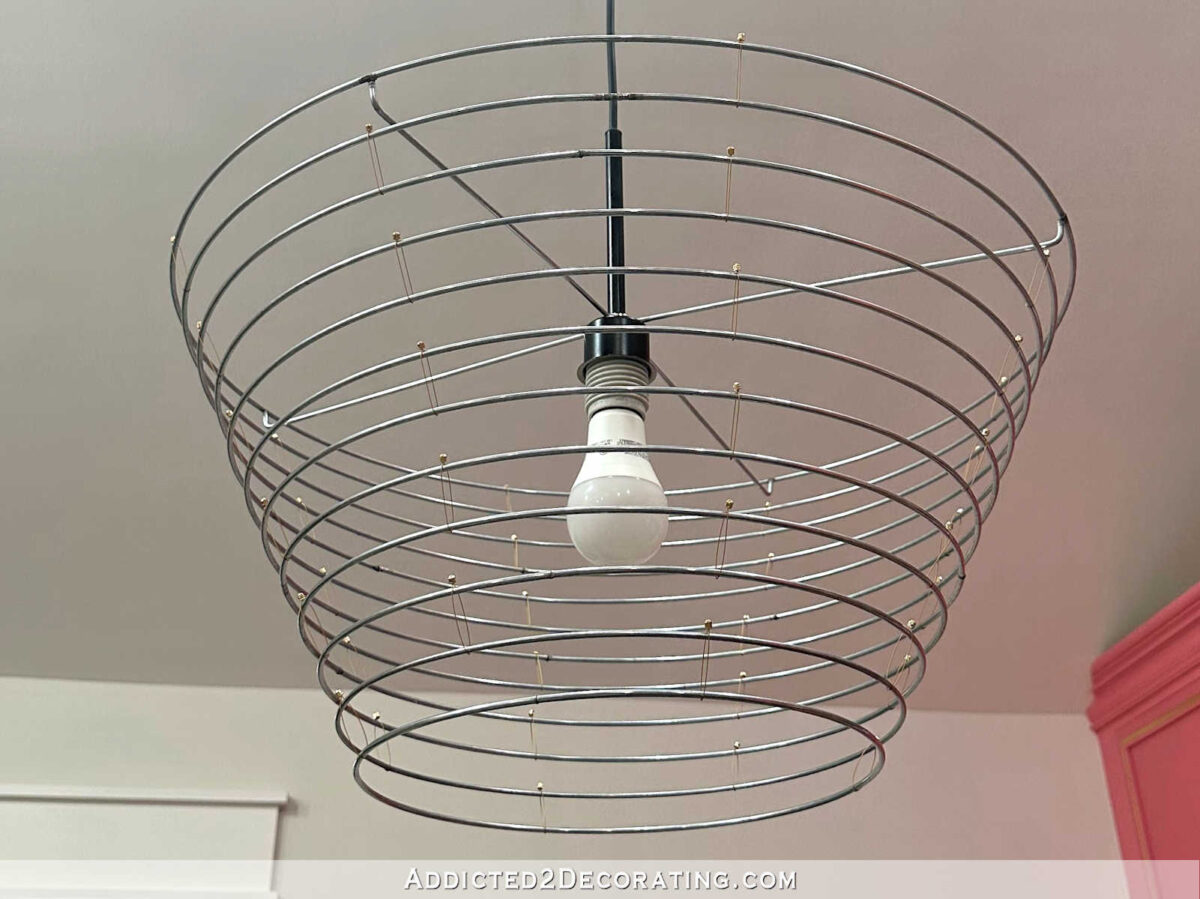
On Friday, I said that I was sure that I could get all of the spoons painted and assembled on the lampshade rings for the pendant light that is going above my studio desk. But I also said that I wasn’t confident that I could get the whole light assembled over the weekend. I just had a feeling that that would be the complicated part. And while I was right, I honestly had no idea just how right I was. I had no idea just what I was in for, and I had no idea that it would take me ten tries, and ten different ideas (and nine failures) before I found the right solution. Here’s how my weekend went…
Idea #1
My first idea was obviously to put the light back together using the first idea that I had when I just assembled the lampshade rings a couple of weeks ago. That first time, I used beading wire and screw-on crimp beads, both of which are used to make jewelry.
So I started off using that process to re-assemble all of the rings once I had all of the painted spoons attached to the rings. But the more rings I assembled, the less confident I became that the wire and crimp beads at the top would hold the weight of all of the rings with the weight of the spoons added. I had about five rings assembled, starting at the top and working my way down, when I decided to abandon that idea and find something sturdier to hold the lampshade rings together.
Idea #2
Since I had attached all of the spoons to the lampshade rings using jump rings, and I had plenty of those left over, I had the idea to use tiny jewelry chain and jump rings to attach the rings to each other.

That seemed like a great idea, except that I would get a few chains/rings attached, and then a chain would slip out of a jump ring and the whole thing would go askew. I’d get that one put back on, only for another chain to slip out of another jump ring, and the whole thing would go askew again. The problem was obviously that the chain was too thin, and I couldn’t get the jump rings closed enough for the chain to stop slipping through the break in the jump ring. So I needed a new idea.
Idea #3
I needed something simple, and my mind immediately went to S-hooks. How easy would that be?! I couldn’t imagine anything being easier or faster! Or so I thought. I headed to Home Depot and bought enough of these 1.25-inch S-hooks to assemble the whole thing. I had such high hopes.

I mean, just look at how easy! Slip an S-hook onto two lampshade rings, use pliers to crimp the hooks so that they would clamp around the lampshade ring wire, and taa-daa! Done! Right? It’s quick and simple!

Except that it was too short. It made each row of spoons cover over the next row of spoons way too much so that only about half (or maybe less) of the spoons on the next row showed.

And I got at about five lampshade rings assembled, second-guessing my decision the entire time, before making the decision that they were just too short. So I then had to disassemble all of those rings. And removing those S-hooks once they were crimped onto the lampshade rings wasn’t easy!
Idea #4
I just needed to come up with a way to extend the S-hook a little bit, so then I tried extending it with a jump ring. And I could have used a jump ring on top and on bottom to extend it even further.

But before I got too far with that, I decided to abandon the idea of jump rings altogether. They’re great for jewelry, and they’re great for holding each individual (and very lightweight) spoon to the lampshade ring. But they’re just not made for holding too much weight. And I didn’t feel confident enough in them to trust the assembly of the entire pendant light to small jump rings made for jewelry making.
Idea #5
So I moved on to my next idea — smaller S-hooks. I thought that these would be easier to work with, and easier to crimp onto the lampshade rings, than the bigger 1.25-inch S-hooks.

So I put two of them together, and…

…not only was it ugly, but it was too short. Of course, I should have known that. If the 1.25-inch S-hook was too short, then two 3/4-inch S-hooks put together are going to be too short since that’s literally the same length. 😀
Idea #6
Then I tried using one 1.25-inch S-hook and one .75-inch S-hook. The length was good. I’d say it was perfect. But getting those S-hooks crimped to each other, and then crimped onto the lampshade rings was not easy, and they just didn’t look good. It looked big and bulky, and I wanted something smaller that wouldn’t look so bulky.

Ideas #7 and #8
So back to Home Depot I went, and this time I bought the smallest chain they had with links that could be pulled apart (i.e., I couldn’t use chain with the links soldered closed). This is what they had.

I had high hopes. But the problem is that if I used three links, it was too long…

And if I used two links, it was too short.

Two links got me right back to the same length as one large S-hook.

I literally needed 2.5 of those links. That would be the perfect length, but I didn’t want to cut those links in half. Even though it’s possible to cut them in half because of how they’re made, and just use 1/2 of a link, cutting it in half looked ugly. I just didn’t want to do that. So I headed back to the drawing board.
Idea #9
I headed back to Michael’s one last look at any options they had, and I purchased these split rings. Split rings are like keychain rings, but these are for jewelry, so they’re pretty small.

I had the idea that I could basically create my own chain out of split rings. And since no jump rings would be used, and split rings are much more secure, I was sure this would work. So I bought all they had, and headed home. But I quickly realized that this idea was a bust. I sat there for a good five minutes just trying to get two split rings put together (and destroyed my fingernails in the process), but the split rings were so tight that I never even got two put together, much less enough to form a chain. So there’s no way I was going to sit there and try to assemble enough to put the entire light together. I don’t think there’s any way I could have gotten one of those split rings around the lampshade ring wire.
Idea #10 — THIS ONE WORKED!
Then it came to me. The split rings were about the size of 1/2 of a link of the small chain. And 2.5 links of that chain would be the perfect length. So I took two individual links of the chain, and assembled them with a split ring in the middle, and this is what I had…

And…IT WORKED!!! Y’all, if you heard the faint sound of someone crying tears of joy and relief around 5:30pm yesterday, that was me. It took me ten tries, but I finally…FINALLY…found something that would work. It was strong, so there was no way it was going to come apart on me. And it was the right length. It’s not the right color, but that’s nothing that a small paint brush and some liquid gold gilding can’t fix.
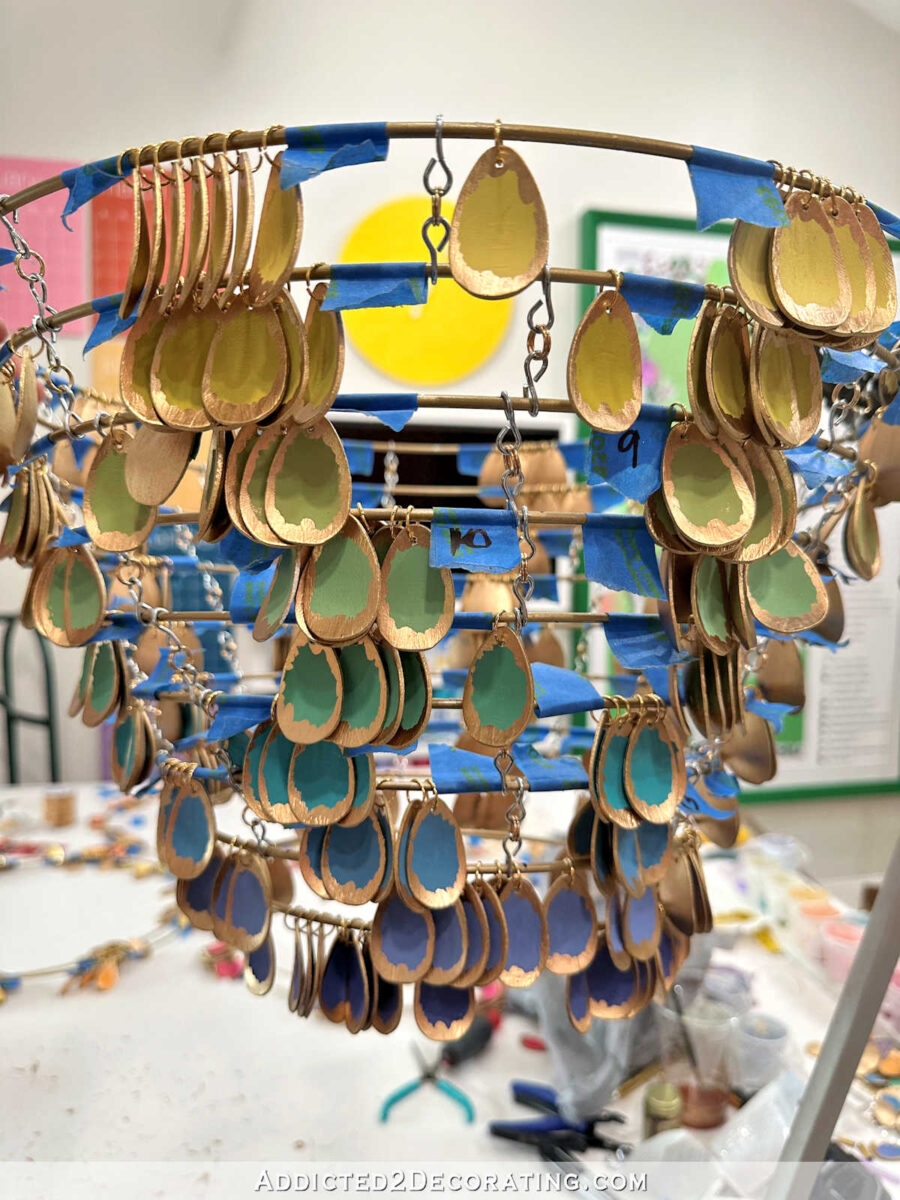
So I got nine rings assembled to each other before I went to bed last night, and instead of attaching each ring to the next ring in four places, I decided to do eight. It makes the whole thing so much more stable. I don’t have them lined up yet because I’m still assembling everything. But once I get the whole thing assembled, I’ll go back and line everything up just right, and then start putting the spoons in place.

When it comes to DIY, I generally have quite a bit of stick-to-itiveness. But let me tell you, ten rounds of trial and error is almost enough to break me. Had I not spent all of those hours cutting, sanding, priming, painting, gilding, and attaching spoons to lampshade rings, I would have given up around round five and tossed this in the garbage. But after all the work I had put into it already, I was determined to see it through. But the next project that takes me ten rounds of trial and error probably won’t be so lucky.

Addicted 2 Decorating is where I share my DIY and decorating journey as I remodel and decorate the 1948 fixer upper that my husband, Matt, and I bought in 2013. Matt has M.S. and is unable to do physical work, so I do the majority of the work on the house by myself. You can learn more about me here.