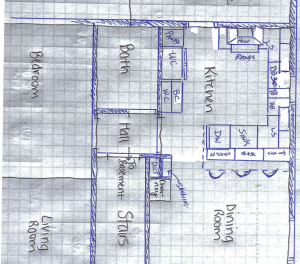

When you’re planning a kitchen renovation or relocating one within the parameters of existing walls like we did, it can be difficult to visualize how all of those measurements and floor plans will feel in real life.
In this post I will share some of the dimensions for our kitchen and the cabinetry so you can look at the numbers we used on paper and then see what it looks like in the photos of my actual home!
Disclaimers: I highly suggest you consult with your cabinet company and/or a kitchen designer to make sure your layout and other decisions will work. You don’t want to accidentally overlook something or make a decision that you regret later.
These measurements are approximate and layout sketches are for inspiration only rather than an actual design plan. Our drawings were made prior to the renovation and some of it changed later (we swapped the dishwasher and trash drawer, for example) but I hope this post will still offer you a general look at how we fit our kitchen into this existing space (which used to be a dining room!).
Everyone will have a different idea of what an ideal sized kitchen or layout would be. While we were working within existing walls and other non-changeable elements, we were still able to come up with a plan that we’re so happy with. And now that it’s done, every day we think about how comfortable it is for us. We have no regrets. The layout makes sense with the space we have. It’s big enough for our family to gather and cook in, but not so sprawling that one or two people feel overwhelmed in it. It feels welcoming and never cramped.
In this post I will share some reasons we chose this particular layout (and later I’ll share similar details on the adjoining dining space).
Since the reveal of the renovation I’ve received so many kind comments from followers who are using my kitchen as inspiration for their own. I design all of my previous kitchens, too (we’ve moved a lot ha) so I’m always so honored when any of them (or all of them!) inspire others.
Our kitchen layout and space planning
One of our space planning priorities for our kitchen was to also maximize efficiency for our entire main floor.
Our main floor is not large and every room is open to the others. It’s a “compact” home rather than a sprawling one, so we wanted to maximize every space. The layout of the new kitchen also would impact how the entire main floor feels, so we had to do some careful planning to make sure every decision made sense.
We decided to move the location of our kitchen to the back of the house where our former dining room was to improve the overall traffic flow and function as well as the visual flow through the house, even though we worked entirely within the parameters of the existing walls. (You can see all the befores and afters here)

We avoided any layout that would create major barriers to get in or out of as well as any unnecessary roadblocks or bottlenecks within it.
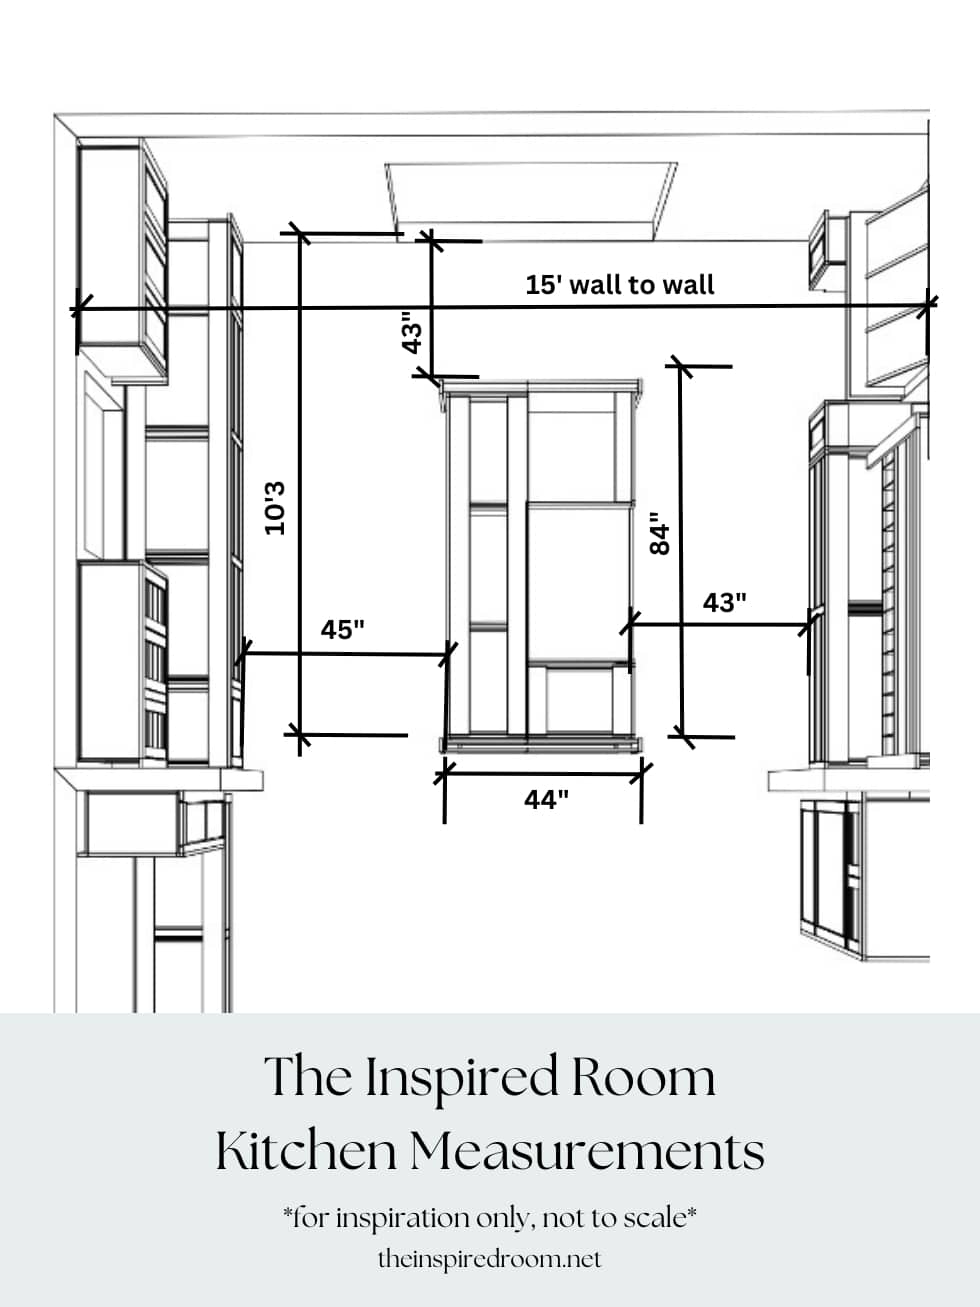
Our whole kitchen is 180″ wide from wall to wall, but since we only had two side walls for our cabinets, once they are all installed, the kitchen floor space obviously is much narrower. We had to take all measurements into all into account, including small details like leaving enough room for the tongue and groove beadboard installation on all walls and space to open drawers and cabinets and appliances.
I cannot stress enough how important it is to be very precise in measurements especially if you don’t have much wiggle room. Ask lot of questions before any contractors begin and pay attention to their work in process so you can speak up if something doesn’t look right.
I hope these numbers will help you get an idea of what might work (it works for us) especially if you are also working in a limited space where every detail counts.
Generously sized kitchens may work for ideal layouts or space planning ideas but some of those suggestions might not even be possible for you if you have a more compact sized kitchen or an unusual arrangement.
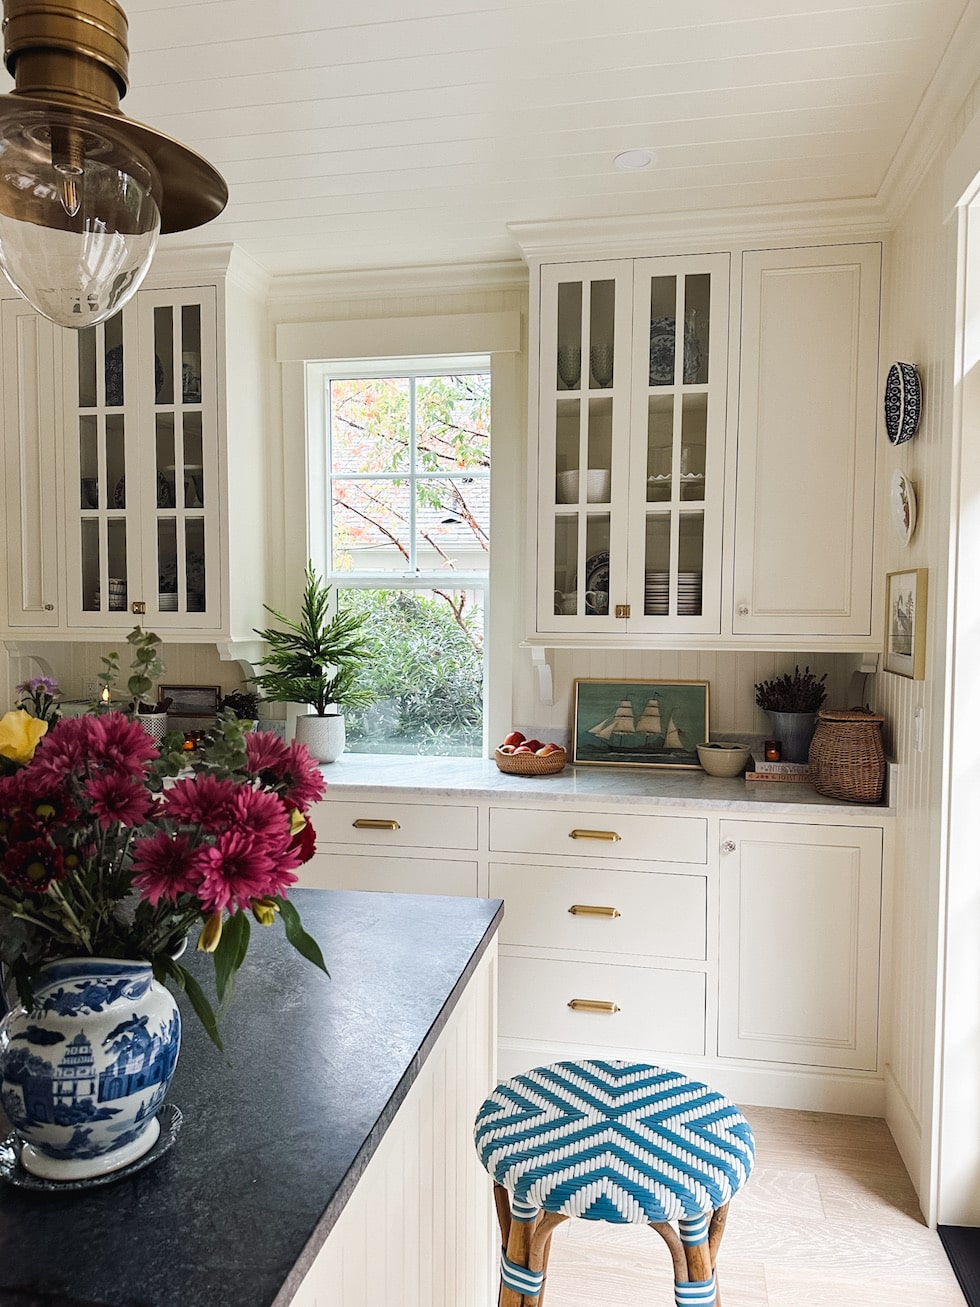
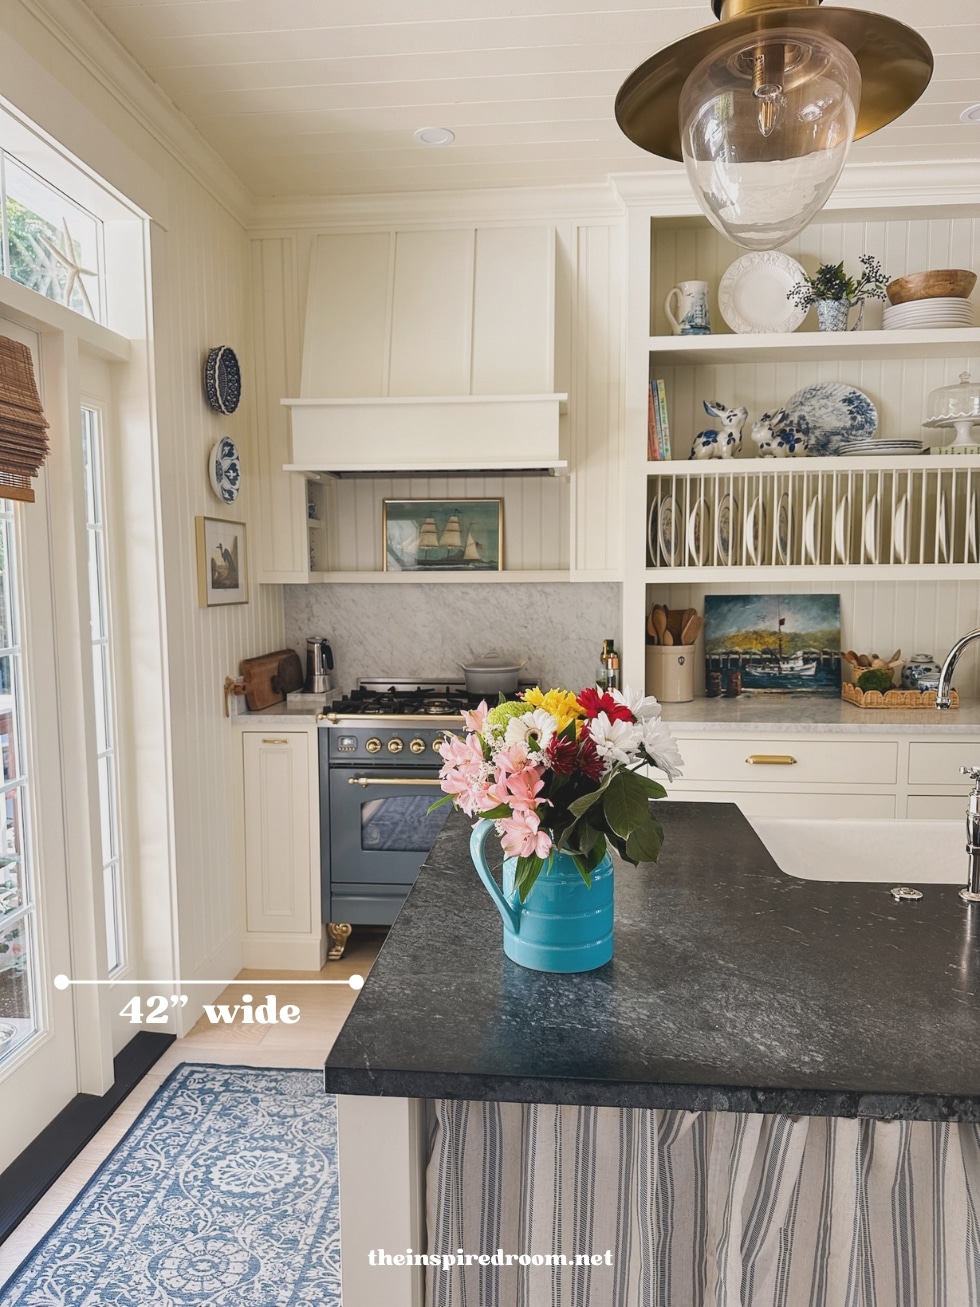
Our work triangle side of the kitchen functions like a galley kitchen and it would be great even if we only had half the width to work with. We are glad we had enough room for the other side, though, so we could add the additional storage, prep and serving areas.
It was important to us to make the “work triangle” side efficient for the chef as well making it comfortable for guests who are there to help or chat!
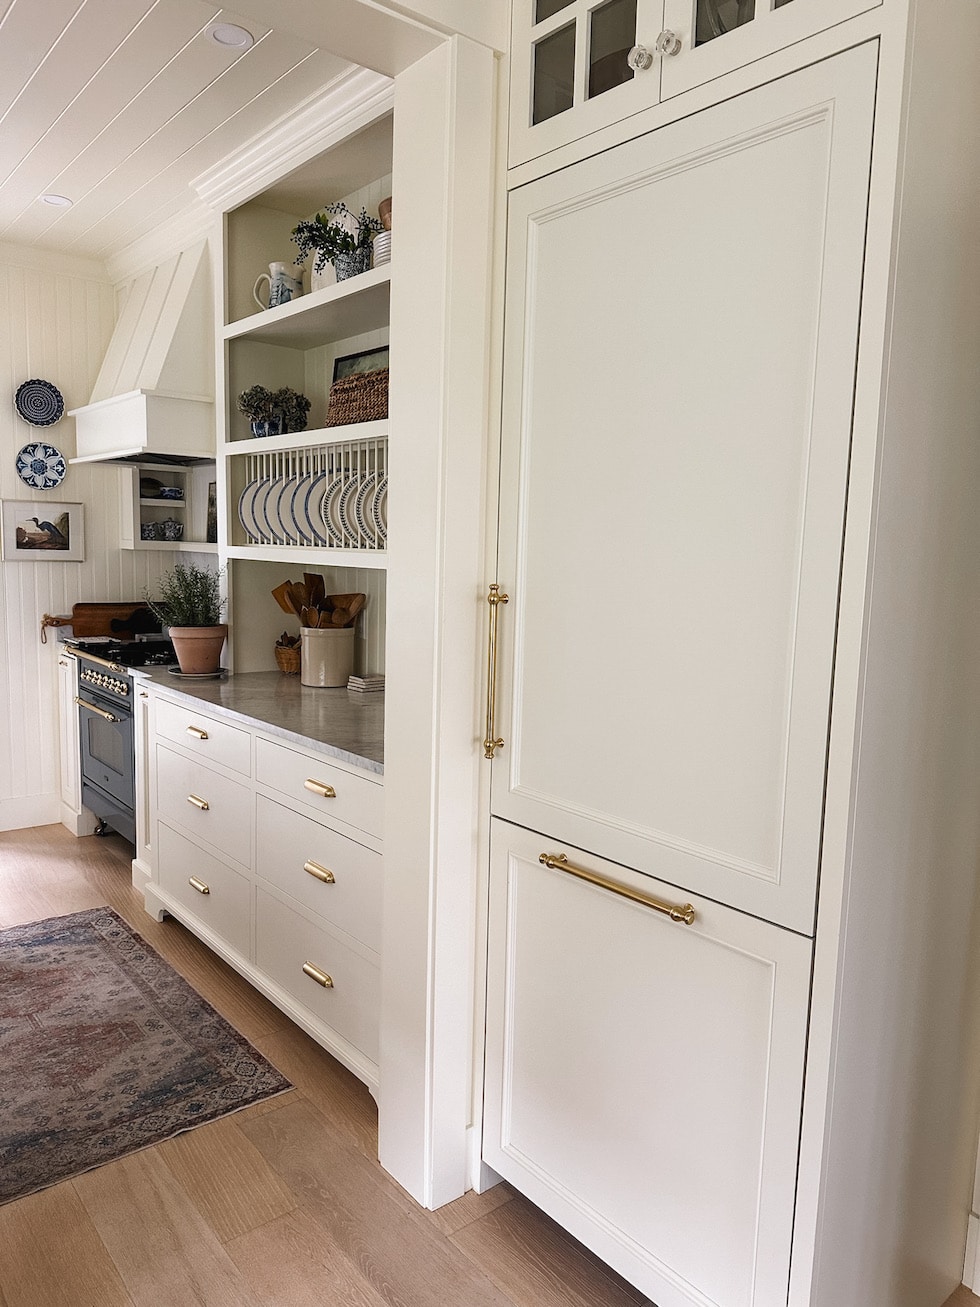
We placed the work triangle appliances within a reasonable amount of steps from each other but also separated enough to make room for people to work there. The stove, sink and fridge are all pulled away from each other so each have plenty of floor space around them. Our fridge was placed just outside the kitchen on the dining room wall (above). Our appliance and cabinet doors can fully open with ease and someone can be at the stove or the sink or fridge or unloading the dishwasher (which is near the fridge in the island) without always crashing into the backside of someone else.
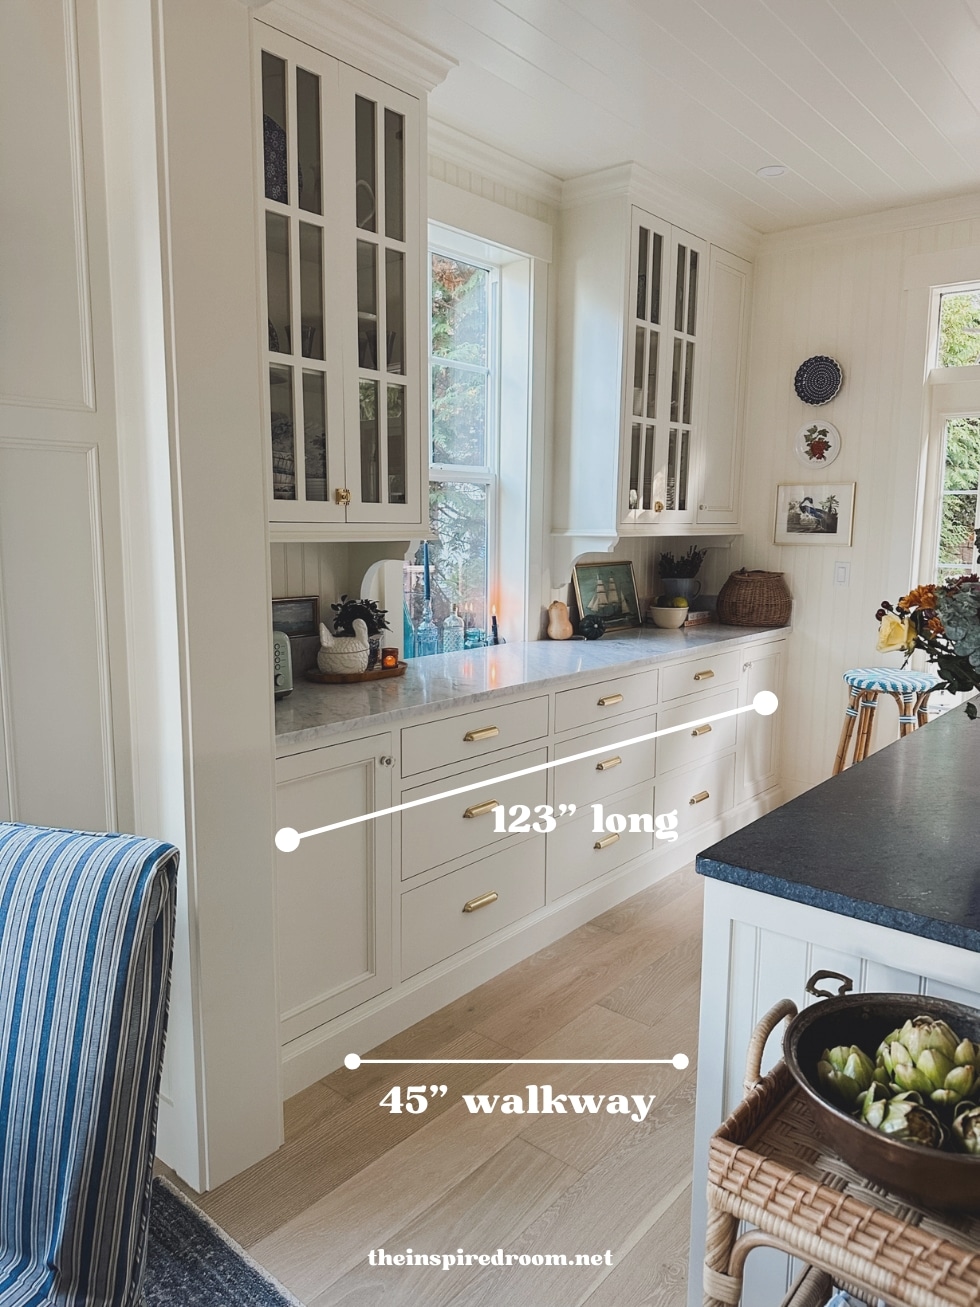
Because our home has limited storage overall we made sure to include plenty of cabinetry. We also wanted as much counter space as we could so everyone had room to help chop or prep and room to set up buffet serving lines.
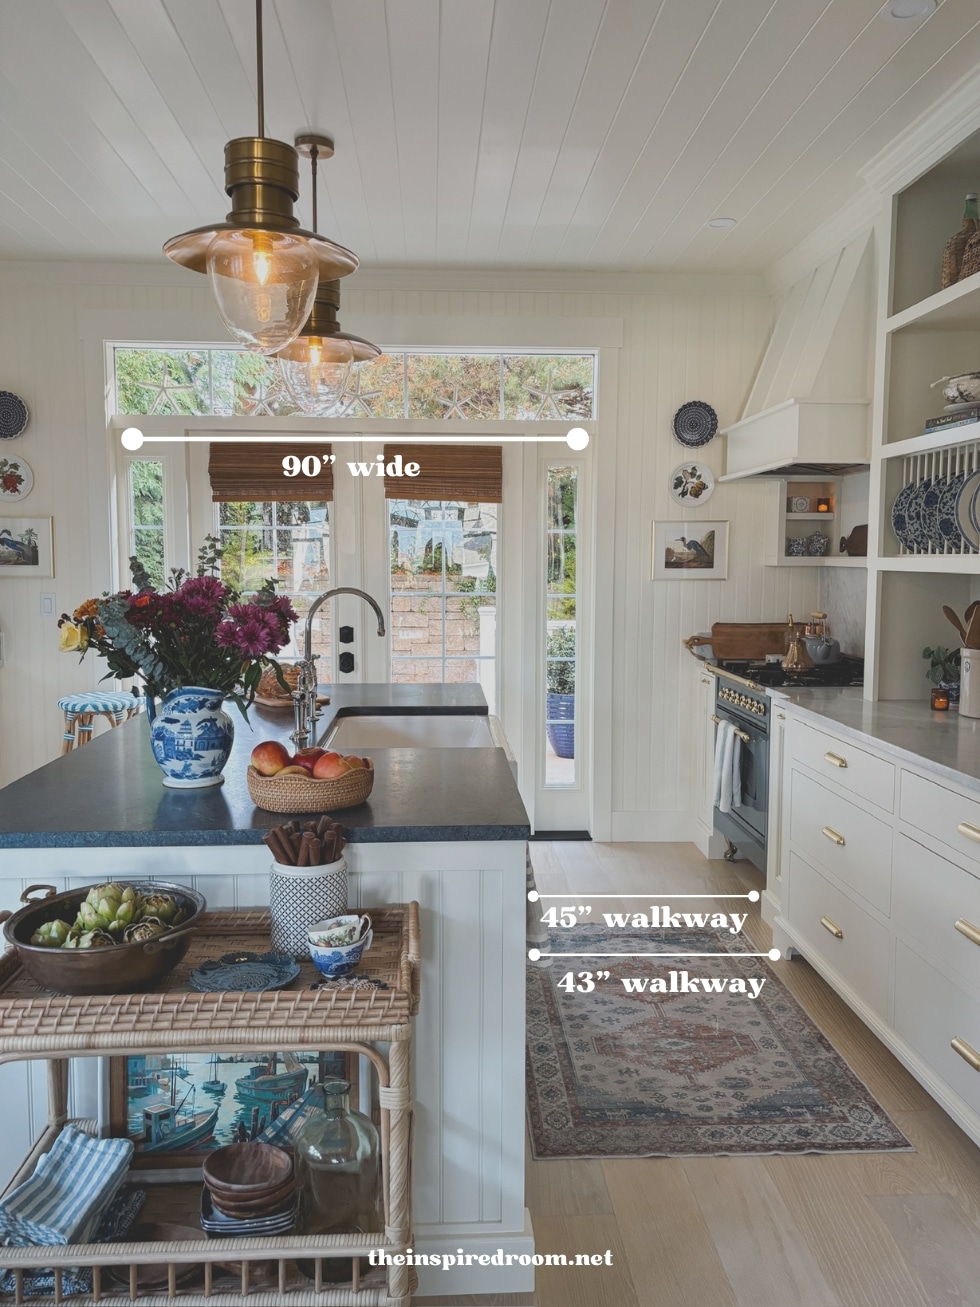
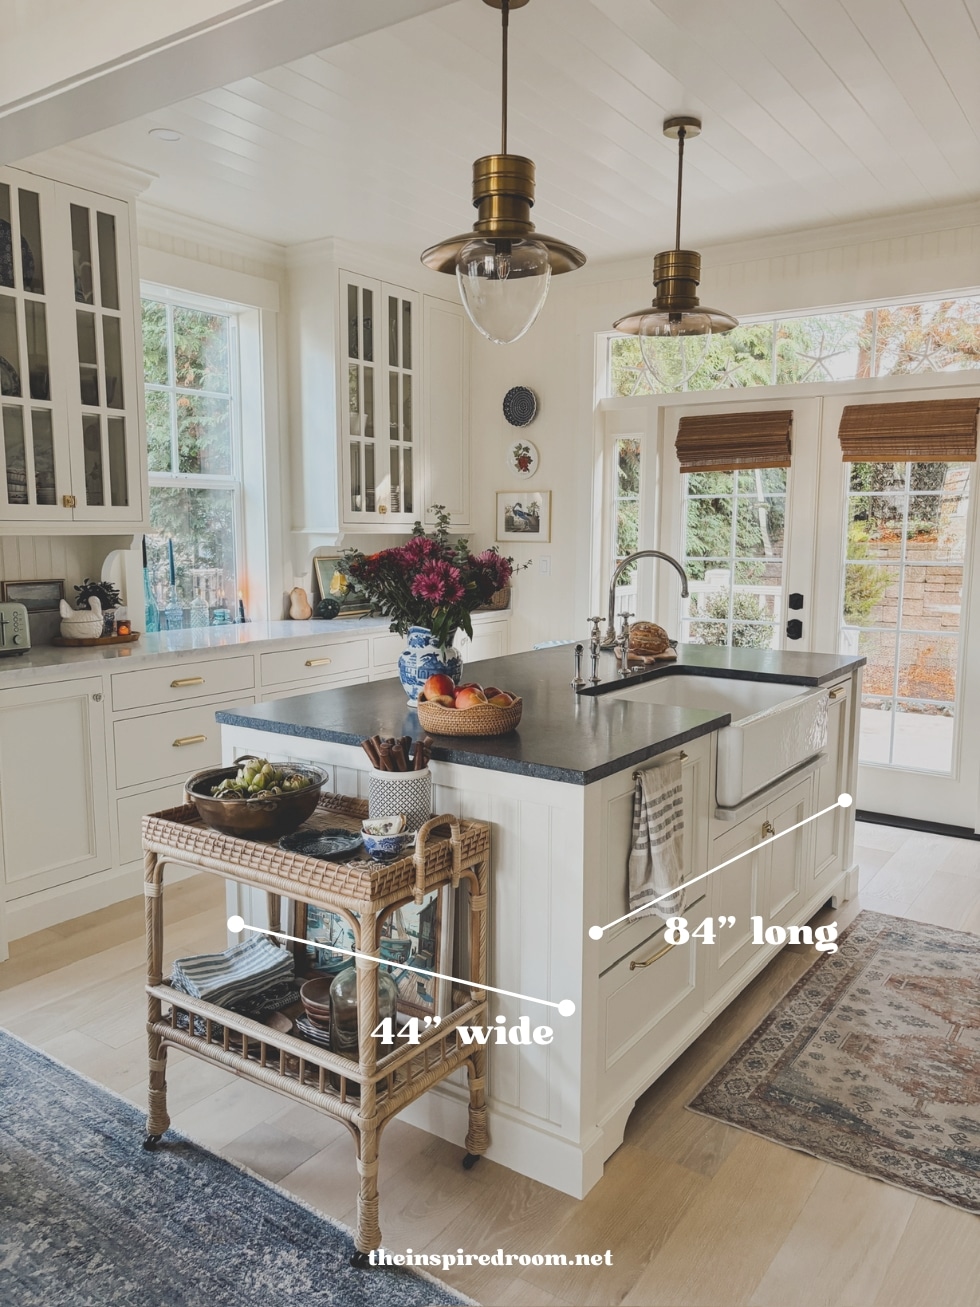
Our island was essential to this layout working and serving all of our needs efficiently. It offers storage, counter space, room for dishwasher, sink and trash and it’s been wonderful for guests and ease of traffic flow! It creates a separated zone for guests to be in the kitchen or go outside without interfering with the cook! Plus we have a little stool cubby for a guest to sit and chat or a spot for someone to eat breakfast, too.
We also wanted the kitchen to breathe and be filled with light. We made sure to allow room for lots of windows and french doors so you can get light and see pretty views from anywhere in the kitchen.

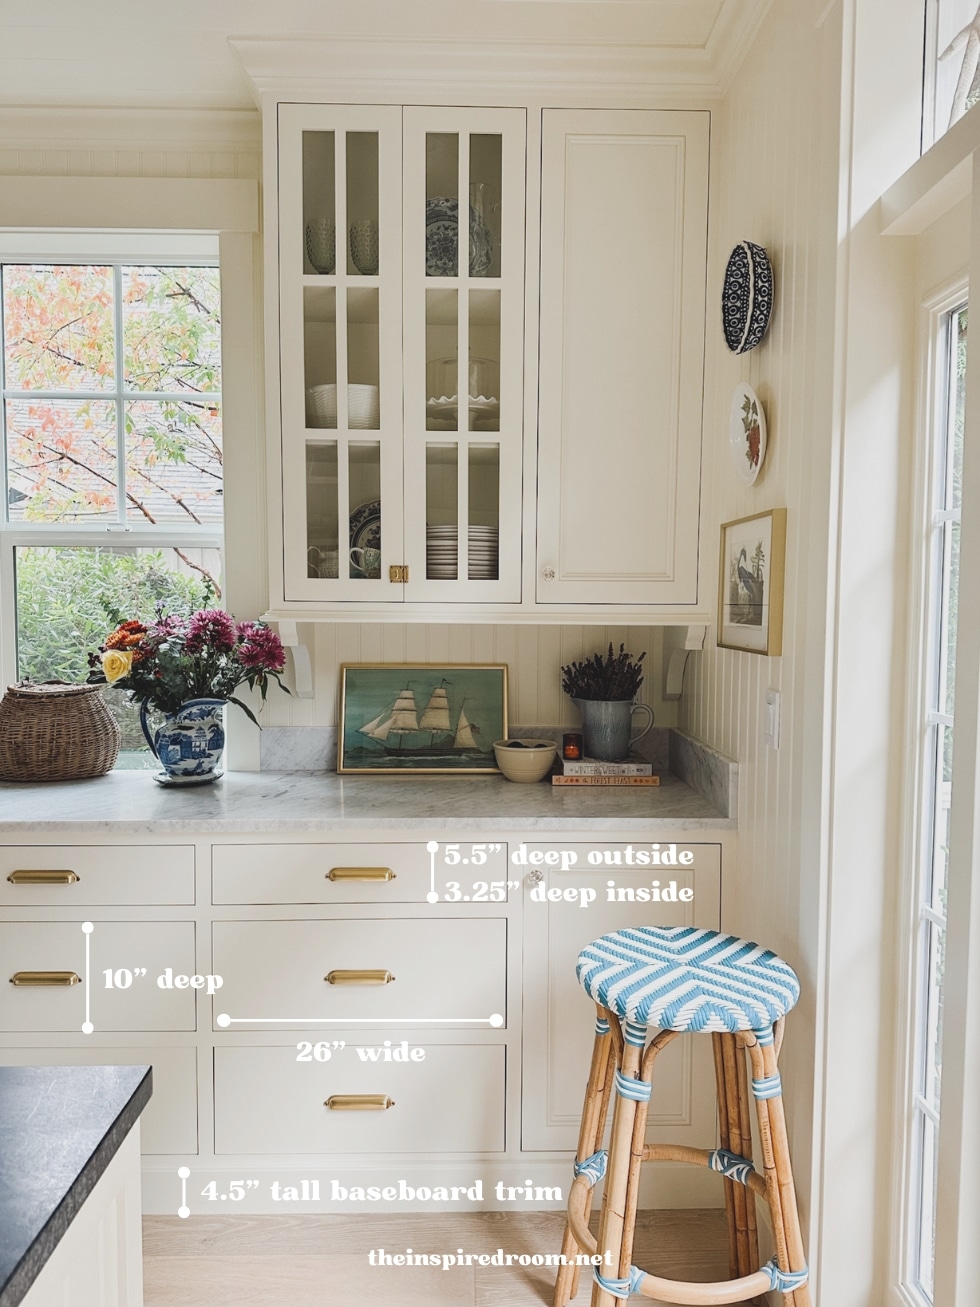
We chose “inset” drawers which sit flush within the frame, but they do have slightly less space inside than overlay cabinets. I never even think about that, we have more than enough room in every drawer and cabinet. I love the traditional look.
We also opted for baseboards with decorative toe kicks in some areas and solid in others. Toe kick styles or solid baseboards will be up to your personal style and preferences, but it is also important to consider up front as these details impact cabinet choices, space planning and contractor expertise as well.
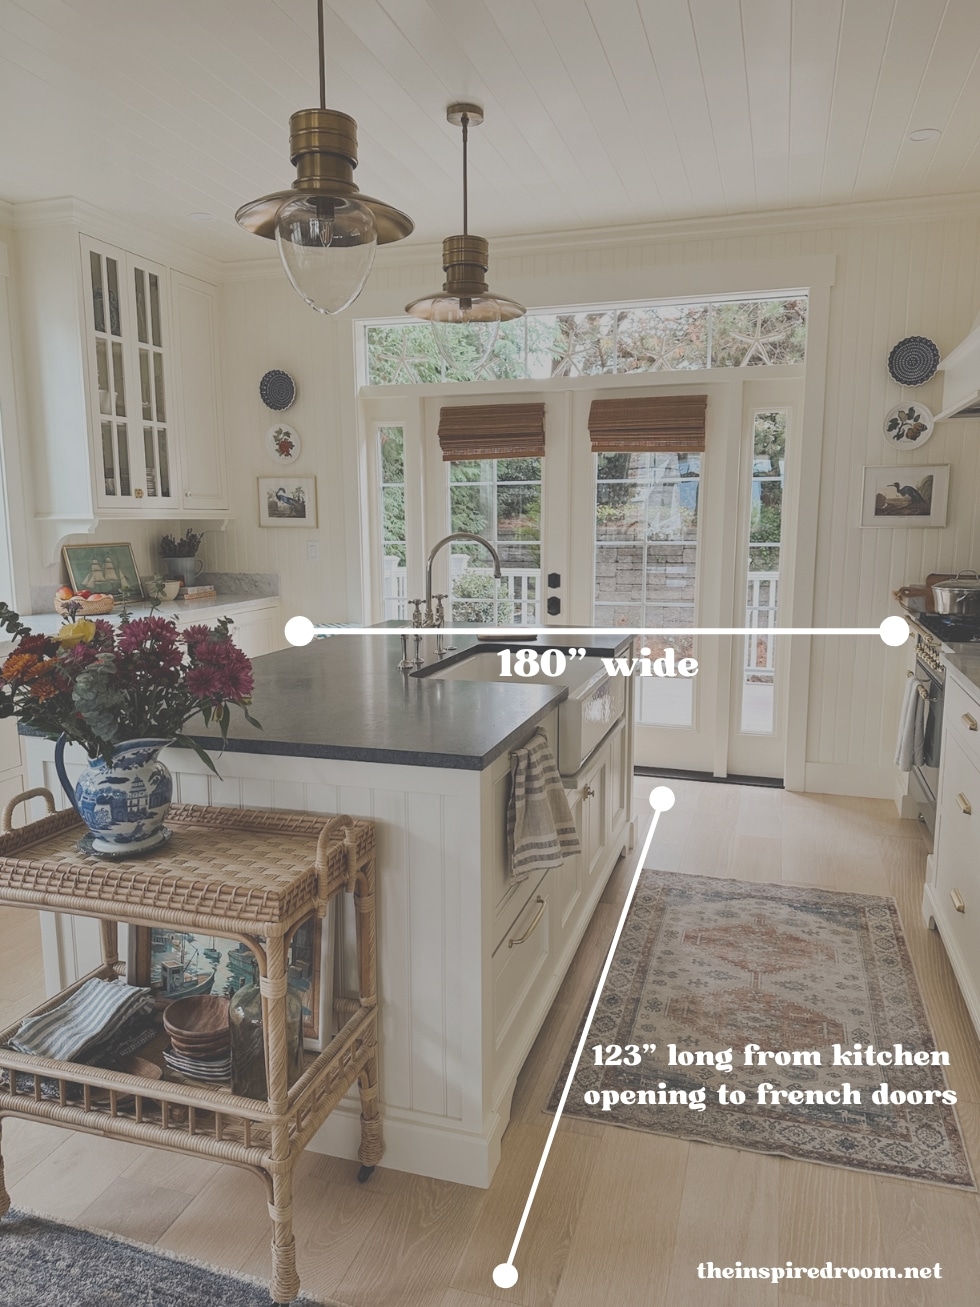
Our kitchen started out 180″ wide wall to wall, but keep in mind with this particular layout once cabinets and thick tongue and groove wall treatments are installed the width will be more from backsplash to backsplash!
I love how cozy it feels in here, but it also feels very open and comfortable to work in, too. You can walk all the way around the room and not run into anything and you never feel like you’re trapped!
I hope this was helpful! Let me know if there are any questions on what I shared above or if I missed anything!
I am often asked for specific design advice or kitchen consultations, I wish I could help everyone with their homes! While I no longer hire out for private consultations, scroll down to learn how I am able to help people with their design questions and more.
More Kitchen Posts:
Our Coastal Cottage Kitchen Tour, Reveal, and Sources
You can see the BEFORES and AFTERS of our kitchen here.
See ALL posts on my kitchen here.
How I Can Help You With Your Home
I get a lot of emails and messages on specific renovation and design questions. I love to answer as much as I can, but I don’t offer personal design consultations any more (although that’s how I started The Inspired Room nearly 18 years ago).
The blog is the place where I can share inspiration and progress in my home, but a little over a year ago I had an idea for how I could better help people on a more personal level.
Last year I opened an affordable membership community so I could have a place where I would be able to devote time each week to not only teaching various decorating concepts and homemaking principles I think are of value, but also to have a private place where our community can follow along, connect and even post any questions, photos and design dilemmas they are having.

I love this community and the opportunity to help! It’s been wonderful. Our members are amazing! They love to learn and offer ideas and share home projects as well.
This summer I also offered to make AI design boards to members as a part of our teaching series, too, so they could see new ideas for their home. It’s been really fun.
JOIN US!
We’re starting our Fall Nesting session in the HomeBody Gathering Place community in September, I would love to have you there!
Come ask questions, get inspired and learn with us!