Ten DIY updates to customize stock kitchen and bathroom cabinets.
Over the years I’ve made a BUNCH of different DIY updates to basic kitchen, bathroom and laundry room cabinets that make them look so much more custom.
You don’t have to spend a ton on cabinets! I prefer to use inexpensive, unfinished cabinets for my projects and then dress them up.
If you’re willing to put the time and effort in, you can completely customize your stock cabinets with some time and sweat equity.
I rounded up my ten favorite ways to update inexpensive cabinets and make them MUCH more functional and high end looking.
1. Paint your cabinets!
OK, this one is the most obvious, but is also the DIY that makes the biggest impact for sure.
If you want to transform your cabinetry by painting them, make sure and take the correct steps. Doing this correctly will make them super durable and looking beautiful for years!
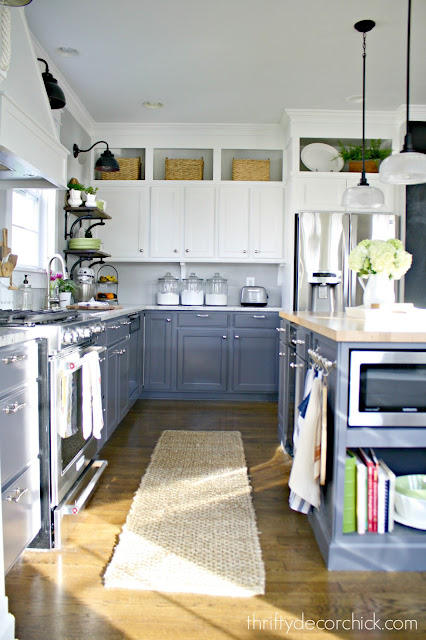
I painted all of our kitchen cabinets in our last house:
Don’t underestimate the difference a couple coats of paint will make — this is my number one recommendation for updating your kitchen or bathroom.
2. Extend cabinets to ceiling
I’ve added this custom cabinetry touch in both of our homes. If your cabinets don’t go to the ceiling, closing in that space can make them look more high end.

This post may contain affiliate links for your convenience.
I may earn a small commission when you make a purchase through links.
Since we had about 18 inches to work with between the top of the cabinets and the ceiling, I opted to create a thick header, as well as the open decorative shelves at the top of the kitchen cabinets.
Figuring out the balance is important if you want to try this DIY project. I’ve seen some people fill in a very large opening with just open spaces and no header — this can look off if that open space is too tall.
The cabinets and open shelving end up competing against each other. Adding a header with molding at the top helps to balance everything out.
I’ve also seen some close in a large space with just a header, and that can feel super heavy.
I recommend doing a combination of additional cabinets and/or open shelving and a header if you have significant empty space over your cabinets.

3. Build in the fridge (and add storage!)
This first project ties in nicely with extending your cabinets to the ceiling. Before I extended the cabinets in our old kitchen, I first reinstalled the cabinet above the refrigerator:

After I filled in that space above the cabinets and painted, it all came together beautifully:

I created this built in fridge by adding plywood supports on the side. If you know where your cabinetry is from, you may be able to find a refrigerator return end panel that matches them perfectly.
Those can get expensive though, so in our basement, I used large 4×8 plywood cut down to the depth of our fridge, instead of the ready-made option:

The other DIY that can add a whole new look to your refrigerator area is adding some useful storage to the side of the fridge cabinet.
I hung some decorative cutting boards (that we actually use) in our kitchenette:


I absolutely LOVE this added detail — it functions so well and looks great!
Adding unexpected details like this is one of my favorite things to do around the house!
4. Add soft close doors and drawers
This project is a more functional, but when you have it you wonder how you lived without it! If you’re tired of cabinet doors and drawers being slammed, there are a couple of easy ways to make them soft close.

To do this, you’ll need to remove the old ones (I recommend taking the doors off the cabinets first). It takes some time but is a more permanent fix.

They are super easy to attach and work great! Ours have held up well for years. I shared a full soft close door tutorial with video here.
You can do the same treatment to existing cabinet drawers as well. I’ll share a link on how to change your regular drawer slides to soft close versions next!
5. DIY pull out sliding drawers

They only come with a few shelves though, so I built these pull out drawers and created SO much more storage space for our pantry items.
You can also see how see how I made all of those drawers soft close in that post as well. I plan to add these DIY drawers to our base cabinets in the kitchen someday.
6. Add pretty hardware
This one is a more obvious update, but is one of the easiest kitchen cabinet details to change! Don’t underestimate the difference new hardware can make in your bathroom or kitchen.

I ended up using the handle versions again on our laundry cabinets:


Your hardware in the kitchen does not have to match exactly. As long as the metal tone or finish is similar, you can change up the pulls and knobs a little bit throughout the space.
7. DIY decorative cabinet feet
As I’ve studied beautiful kitchens over the years, smaller details like custom “feet” added to the bottom of cabinets have always stood out to me.
I loved the look so much and did some research. Turns out this custom addition can get really expensive!

I was worried about dust and little crumbs getting stuck behind them, so I shared how I fixed that issue as well!
Our kitchen has a more detailed version, and I made them even simpler in our pantry and laundry room:

If you’re skilled at using a jigsaw, you could make these from scratch easily! My tutorial is done with store-bought options that are easy to cut to size.
8. Installing DIY light rails
I tend to love the little detail projects even more than the bigger ones. I love when you can tell there’s a small custom touch, but you can’t always figure out what it is right away.
Light rails aren’t standard in most kitchens, but I find them to be useful and more aesthetically pleasing.
Sometimes under cabinet lighting can look unsightly from the side or straight on in a kitchen. I LOVE the added accent and task lighting these add, but don’t always love the look of them.

Light rails are added to the front and sides, underneath the cabinets to block the lighting hardware.
This trim also helps to conceal the builder brown finish on the undersides of most wall cabinets.

It’s such a small, customized touch for not much money and time. I’ve added these to the kitchens in both of our houses over the years, plus our laundry room. I plan to install them in our kitchenette as well.
9. Custom side panels on cabinets
Most cabinets come with a very basic and bland end panels.

I’ve also added very simple board and batten trim to the sides of our kitchen cabinets and the laundry drawers:


This is a very inexpensive project but makes a big difference!

You can do any design you like! If you prefer a more cottage or farmhouse look, beadboard would look great!

10. Add detail to plain cabinet fronts
This is of the most labor intensive cabinet projects, but it sure does pay off! I started with very inexpensive, stock cabinet drawers in our laundry room:

I wanted the paneled look of a Shaker style, with trim around the edge of each drawer front.
It worked beautifully and they still look as great as the day I installed them!:

I hope these DIY cabinet projects give you some inspiration in your own home! If I could recommend just one or two of these projects, I’d say that painting and adding new hardware will give you the biggest impact.
But the other cabinet updates will definitely make your kitchen look way more expensive than it really is! With a little time and sweat equity, there are no limits to what you can do.


